|
|

|
|
|
WTC 1 floor load distribution before and after local structural failures 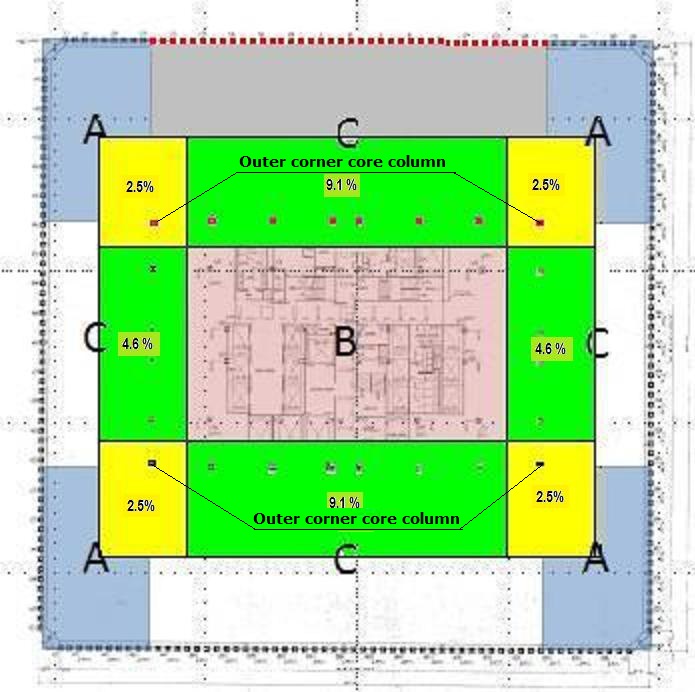 Yellow areas floor load is carried by the 4 outer corner core columns. They alone carry 10% of the mass of the tower! Green areas floor load is carried by 20 outer core columns. They carry 27.4% of the mass of the tower. 24 off outer core columns thus carry 37.4% of the mass of the tower! If these columns alone are locally cut off, maybe 80% of the mass carried by these columns is transmitted to the walls, that may be ripped apart and the tower structure above displaces down. Pink area floor load is carried by the inner core columns. They carry abt. 16.7% of the mass of the tower or maybe less, say 12.6% due to shafts, thinner floors, etc. Then about 50% of the mass of the tower is carried by the core columns. Core columns are rivetted or welded together. The gray area floor load is carried by the red perimeter wall columns. The other perimeter wall columns carry the load outside the yellow/green areas. Note that the perimeter wall columns carry different floor loads as the width of the floor varies. About 50% of the mass of the tower is carried by the perimeter wall columns. Perimeter wall columns are bolted together. In case the red perimeter wall columns fail at one wall side (buckling due to heat and the bolted floor connections to the perimeter columns shear off), the local load on the gray floor area is only transmitted to the opposite violet outer core columns As only a few floors are involved, the violet outer (opposite) core columns will not be overloaded (they carry already plenty load from above). Structure above the locally failed red perimeter wall columns may displace down or drop down to the ground or is carried by the intact structure above (redundancy due to bolted spandrels - already seen at the initial damage - the hole in the wall - and further failures are arrested). There is no way that local failures of red perimeter wall columns in one side will expand to other sides perimeter wall columns (and cause local failures around the whole area and later global failure of the core and other structure below - due to free fall of upper block and impact of upper block on columns below causing a shock wave in the structure below - and the upper block, intact, pushing down the structure below). One reason is that the floors are only bolted to the wall columns and the bolts are the weakest link and will shear off before any load is transmitted from the perimeter to the core. Therefore local collapse of perimeter columns will not really affect core structure. The hat trusses will shear off if trying to transmit loads from perimeter to core. Read also about collapse arrest. There is no way WTC1 could globally collapse 911 2001 from top down as shown live on TV due to local structural failures up top. What was shown live on TV was just a pre-fabricated Hollywood show of a strange building collapse, smoke, dust and perimeter wall sections flying around that could not happen in reality. Anders Björkman 5 June 2008
|